Interior Architecture Design 1 - Assignment 2.2

By Unknown - Wednesday, May 24, 2017

11/5/2017 - Week 7
Ellyn-Faye Tan Jie Xin - 0327019
Interior Architecture Design 1
Assignment 2.2 - Transformation

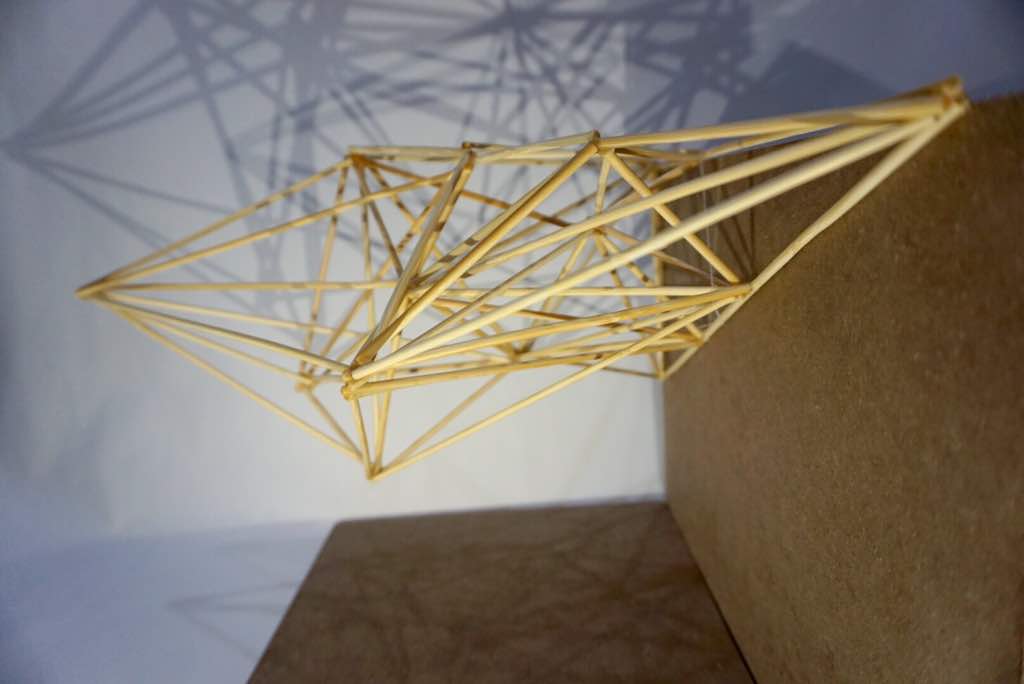
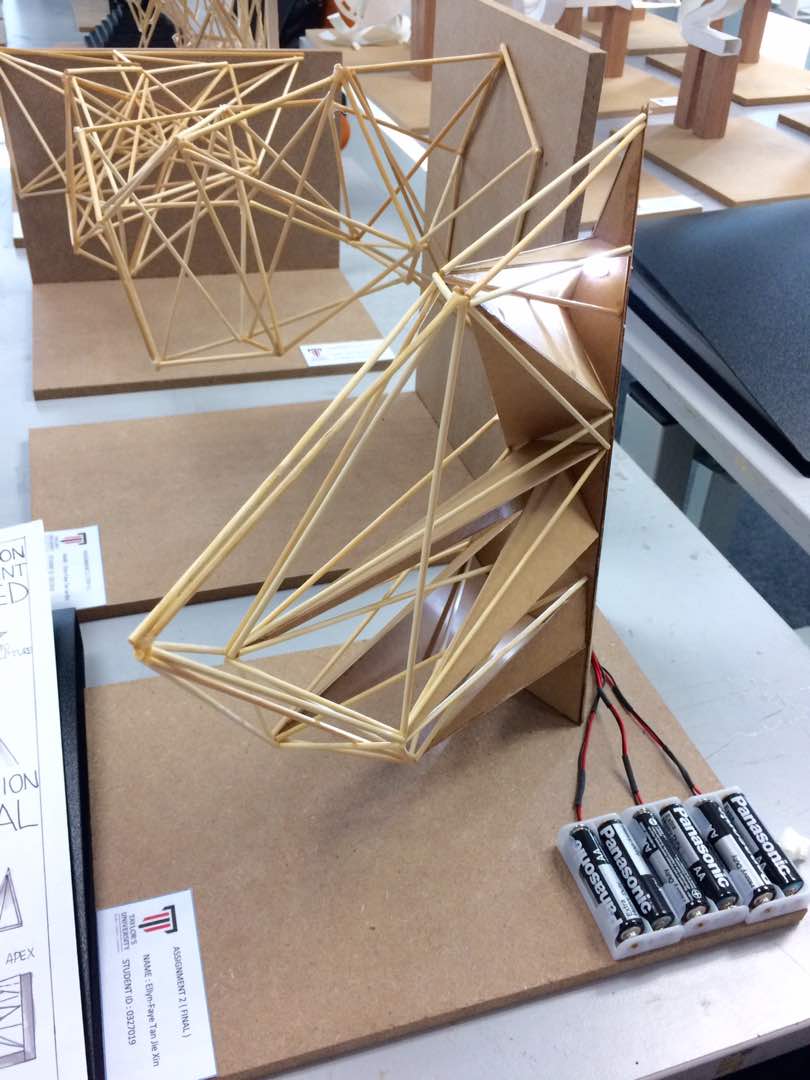
A light sculpture inspired by our previous assignment of chair, in my case, Chair_One. We were assigned to make a light sculpture to compliment and match the settings of Chair_One. We were to design and make a base model of our light sculpture from what we see as inspiration. We had to first choose a formal organization and two keywords (tangible and intangible), then to create a sculpture (base model) from any idea we have in mind. We had to do a minimum of 4 processing sculptures (Base Model, Step 1, 2 & 3) and 1 final light sculpture. We were then told to draw and sketch out our whole process of inspiration, transformation and ideation on butter paper.

Step 1:
Position/Attachmemt

Step 1 sculpture to be continued from base model but to be either suspended, hanging, mounted, extruded or cantilevered.

Step 2:
Physical Alteration

Step 2 sculpture to be continued after step 1 but physically, must be either twisted, split, bent, folded, expanded, morphed or enveloped.

Step 3:
Design Variation

Step 3 sculpture to be continued after step 2 but to variate with either rhythm, repetition, multiply or solid-skeletal.


Chair_One (Main Inspiration)


Base Model
ANGLES & APEX

Formal Organization:
Clustered Form

Keywords:
- Sharpness (Tangible)
- Clarity (Intangible)

My base model

Materials:
- Bamboo Skewers
- Thin Cardboard
- UHU Glue
- Super Glue 
- Black Spray Paint

Butter paper ideation on base model

Feedback from lecturer on Base Model:
Better not to spray paint it but to use the original and natural colour of the materials for my further sculptures. Overall liked that it is very clustered.


Step 1
CANTILEVERED

After doing my research on the other keywords, I think that my sculpture would look really good when it is cantilevered to enhance the shadows when it is cantilevered over a space. 

Inspiration for cantilevered sculptures

My step 1 cantilevered sculpture

Materials:
- Bamboo Skewers 
- Thin Cardboard
- Balsa Wood Strip
- MDF Board
- UHU Glue
- Super Glue

Initial butter paper ideation I did before making the actual sculpture

Butter paper ideation on step 1

Feedback from lecturer on Step 1:
I had difficulties with sticking the balsa wood on the MDF board, so Ms Sharmila suggested me to use small nails to connect it but to be careful because the balsa wood strip may split. I managed to use the nailing method and it stays perfectly now. 


STEP 2
BENDED

After a few trials and errors, I found that bending my step 1 sculpture looks a lot better than twisted or splitting. 

Initial butter paper ideation before doing the actual sculpture

Split & Twisted 
I did not use this as my final step 2 but it is the first sculpture I did for step 2. I wanted to explore more so this is just one of my process. 

Inspiration for split and twisted sculpture

My step 2 split & twisted sculpture

Butter paper ideation on step 2

Bended
I chose this sculpture as my final step 2 mainly because it looks better and it turned out more like what I imagined. It still contains my formal organization, clustered form, and therefore, it is makes more sense to me and it is more relatable. 

Inspiration for bended sculpture

My step 2 bended sculpture

Butter paper ideation on step 2

Materials:
- Bamboo Skewers 
- MDF Board
- UHU Glue
- Super Glue

Feedback from lecturer on step 2:
The first split and twisted sculpture was way too neat and stiff, which does not reflect my original organization. The second and final step 2 sculpture is a better choice in terms of my keywords and organizations.

Step 3
SOLID-SKELETAL

After trying out with doing 2 sculptures, I found that the second one I did was better because I added real solid to the sculpture and it has more volume and depth to it. 

Initial butter paper ideation before doing the actual sculpture

Solid-Skeletal
I did not use this sculpture as my final step 3 sculpture but I definitely needed this sculpture to explore more on having different solidness as I was only using bamboo skewers. I also tried changing triangles into pentagon but I did not like the final outcome, therefore, it inspired me to try another one.

Inspiration for solid-skeletal sculpture

My step 2 solid-skeletal sculpture

Materials:
- Bamboo Skewers 
- MDF Board
- UHU Glue
- Super Glue

Butter ideation on step 2

Solid-Skeletal
I chose this as my final step 3 sculpture because I prefer the solidness it has compared to the other step 3 sculpture. It represents more of the meaning and my intention. I also kept the triangle concept because I wanted to keep the consistency and not change my initial base model ideas.

Inspiration for solid-skeletal sculpture

My step 3 solid-skeletal sculpture

Materials:
- Bamboo Skewers 
- Thin Cardboard
- MDF Board
- UHU Glue
- Super Glue

Butter paper on step 3

Feedback from lecturer on step 3:
The first step 3 sculpture needs to be more solid like choosing a different material to make it solid. The second step 3 sculpture is good because it reflects better on the solid-skeletal keyword.


Final Light Sculpture

Final A2 Presentation Board

Final Light Sculpture

Final Presentation Setup

Final Presentation Setup 

 Final Presentation Setup

Final Presentation Setup

  • Share:

You Might Also Like

0 comments